
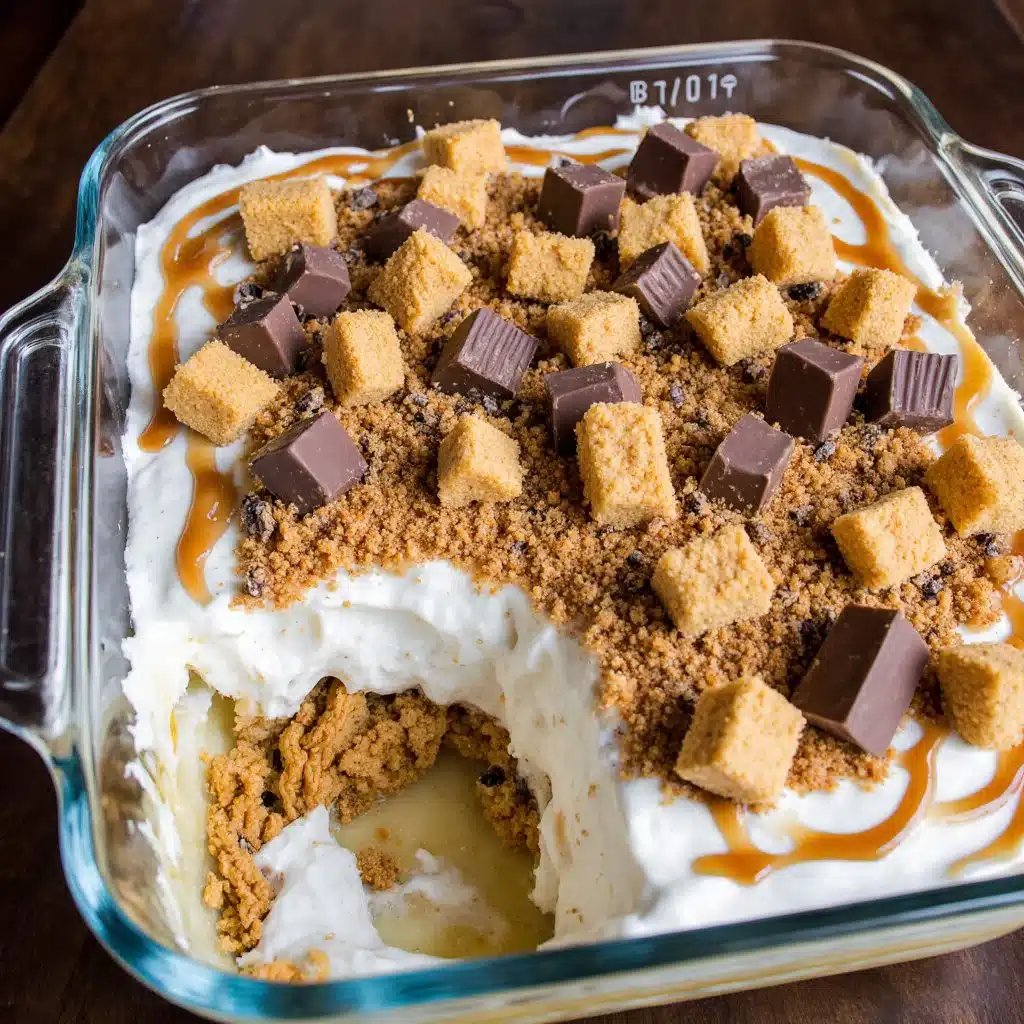
Peanut butter lovers, get ready for a delightful treat that’s not only easy to make but also incredibly satisfying. Think of those hot summer days when you crave something cold and sweet but don’t want to turn on the oven. Enter the Peanut Butter Lover’s Icebox Cake—a no-bake dessert that’s perfect for gatherings, family cookouts, or simply satisfying that sweet tooth.
This dessert layers creamy peanut butter with a crunchy base, all held together with light and fluffy whipped cream. It’s as much a feast for the eyes as it is for the taste buds. Give this recipe a try, and you’ll score big at your next potluck or simply brighten up your weeknight dessert routine.
WHY MAKE THIS RECIPE
This Peanut Butter Lover’s Icebox Cake is a dessert you can whip together in no time. It’s fast to prepare, requiring just a few basic ingredients. With no baking involved, it’s a hassle-free option during warm months or when you’re pressed for time.
Not just easy, it’s also comforting and indulgent, featuring the rich, nutty flavor of peanut butter that pairs beautifully with the sweetness of whipped cream. You can make it ahead of time, allowing the flavors to meld beautifully in the fridge, making it a smart choice for meal prep.
“This is the kind of recipe you’ll want to make again next week.”
HOW TO MAKE Peanut Butter Lover’s Icebox Cake
To craft this dreamy dessert, you’ll layer whipped cream, peanut butter, and graham crackers, creating a deliciously creamy and crunchy treat. The process is straightforward, and the outcome is impressive enough to serve at any occasion—plus, your kitchen will remain blissfully cool.
Here’s what you’ll need to create this delightful icebox cake.
INGREDIENTS
Gather these items for your Peanut Butter Lover’s Icebox Cake:
- Graham crackers (about 2 sleeves, crushed)
- Creamy peanut butter (1 cup)—use natural for a healthier option
- Heavy whipping cream (2 cups)—fresh cream yields the best texture
- Powdered sugar (1/2 cup)—to sweeten the whipped cream
- Vanilla extract (1 teaspoon)—for added depth of flavor
- Salt (a pinch)—to balance the sweetness
Short Notes:
- Substitution ideas: Use almond or cashew butter for a nut-free version or different flavor.
- Quality tips: Always use fresh cream and high-quality peanut butter for the best flavor.
- Optional add-ins: Consider including chocolate chips or crushed peanuts for extra texture.
DIRECTIONS
- Prepare the whipped cream: In a mixing bowl, beat the heavy whipping cream with an electric mixer until soft peaks form. Gradually add powdered sugar and vanilla extract, continuing to beat until stiff peaks form. Set aside.
- Mix the peanut butter: In another bowl, combine the creamy peanut butter with a pinch of salt. Fold in a third of the prepared whipped cream into the peanut butter mixture, gently incorporating it to maintain the airy texture.
- Layer the cake: In an 8×8-inch dish, start by placing a layer of graham crackers at the bottom. Spread half of the peanut butter mixture over the crackers. Add another layer of graham crackers, followed by half of the remaining whipped cream. Repeat the process, finishing with a layer of whipped cream on top.
- Chill: Cover the dish with plastic wrap and refrigerate for at least 6 hours or overnight to allow the layers to meld and the crackers to soften.
- Serve: Slice into squares and enjoy the creamy delight.
HOW TO SERVE Peanut Butter Lover’s Icebox Cake
Presentation is key, so take a moment to make your cake look appetizing. Serve chilled slices on individual plates, garnished with dollops of whipped cream or chocolate shavings.
Side Dishes:
- Fresh berries complement the richness perfectly.
- Vanilla ice cream could add a delightful touch.
Beverage Pairings:
- A cold glass of milk or iced coffee goes perfectly with this dessert.
Occasion Ideas:
- Great for summer BBQs, birthday parties, or as a fun weeknight treat!
STORAGE
To keep your Peanut Butter Lover’s Icebox Cake fresh, store any leftovers in the refrigerator, tightly wrapped. It can last for about 3 to 5 days.
Freezer Tips:
- If you want to freeze portions, wrap individual slices tightly in plastic wrap, then in aluminum foil. It can be stored in the freezer for up to a month.
Reheating best methods:
- Since this is a chilled dessert, simply thaw overnight in the refrigerator before enjoying again.
TIPS TO MAKE IT BETTER
Here are a few insider tips to elevate your icebox cake:
- Flavor Boosters: Add a teaspoon of cinnamon to the whipped cream or the peanut butter mixture for a warm flavor.
- Texture Improvements: If you prefer a crunch, layer in some chopped nuts between the cake layers.
- Timing Control: Allow the cake to chill overnight for best results, giving it enough time for flavors to meld.
VARIATIONS
Experiment with these creative twists on the classic recipe:
- Dietary Swaps: Use gluten-free graham crackers for a gluten-free version.
- Protein Swaps: Replace peanut butter with sunflower seed butter for a nut-free option.
- Flavor Adjustments: Add a layer of banana slices for a banana-peanut butter twist or a layer of homemade chocolate pudding for richness.
FAQs
Can I make this ahead?
Absolutely! It tastes even better after chilling overnight.
How long does it last?
Stored in the fridge, it will last 3 to 5 days.
Can I substitute almond butter?
Yes, you can substitute almond or any other nut butter to fit your taste.
Is it freezer-friendly?
Yes, you can freeze individual slices wrapped well to enjoy later.
How do I fix common mistakes?
If your whipped cream doesn’t thicken, ensure your bowl and beaters are completely clean and cold.
CONCLUSION
The Peanut Butter Lover’s Icebox Cake is a must-try for anyone who enjoys the decadent flavor combination of peanut butter and whipped cream. It’s a crowd-pleaser that everyone in your family will love, perfect for those warm days when the last thing you want is to turn up the oven. Whip it up for your next gathering, and watch it disappear quickly! Enjoy your culinary adventure and happy baking!
Print
Peanut Butter Lover’s Icebox Cake
- Prep Time: 15 minutes
- Cook Time: 0 minutes
- Total Time: 360 minutes
- Yield: 12 servings
- Category: Dessert
- Method: No-Bake
- Cuisine: American
- Diet: Vegetarian
Description
A no-bake dessert that layers creamy peanut butter with a crunchy base and fluffy whipped cream, perfect for warm days and gatherings.
Ingredients
- Graham crackers (about 2 sleeves, crushed)
- Creamy peanut butter (1 cup)
- Heavy whipping cream (2 cups)
- Powdered sugar (1/2 cup)
- Vanilla extract (1 teaspoon)
- Salt (a pinch)
Instructions
- Prepare the whipped cream: In a mixing bowl, beat the heavy whipping cream with an electric mixer until soft peaks form. Gradually add powdered sugar and vanilla extract, continuing to beat until stiff peaks form. Set aside.
- Mix the peanut butter: In another bowl, combine the creamy peanut butter with a pinch of salt. Fold in a third of the prepared whipped cream into the peanut butter mixture, gently incorporating it to maintain the airy texture.
- Layer the cake: In an 8×8-inch dish, start by placing a layer of graham crackers at the bottom. Spread half of the peanut butter mixture over the crackers. Add another layer of graham crackers, followed by half of the remaining whipped cream. Repeat the process, finishing with a layer of whipped cream on top.
- Chill: Cover the dish with plastic wrap and refrigerate for at least 360 minutes or overnight to allow the layers to meld and the crackers to soften.
- Serve: Slice into squares and enjoy the creamy delight.
Notes
For a nut-free version, use almond or cashew butter. Garnish with chocolate shavings or fresh berries when serving.